Table of Contents
Why You Might Need to Remove The Ring Doorbell Cover
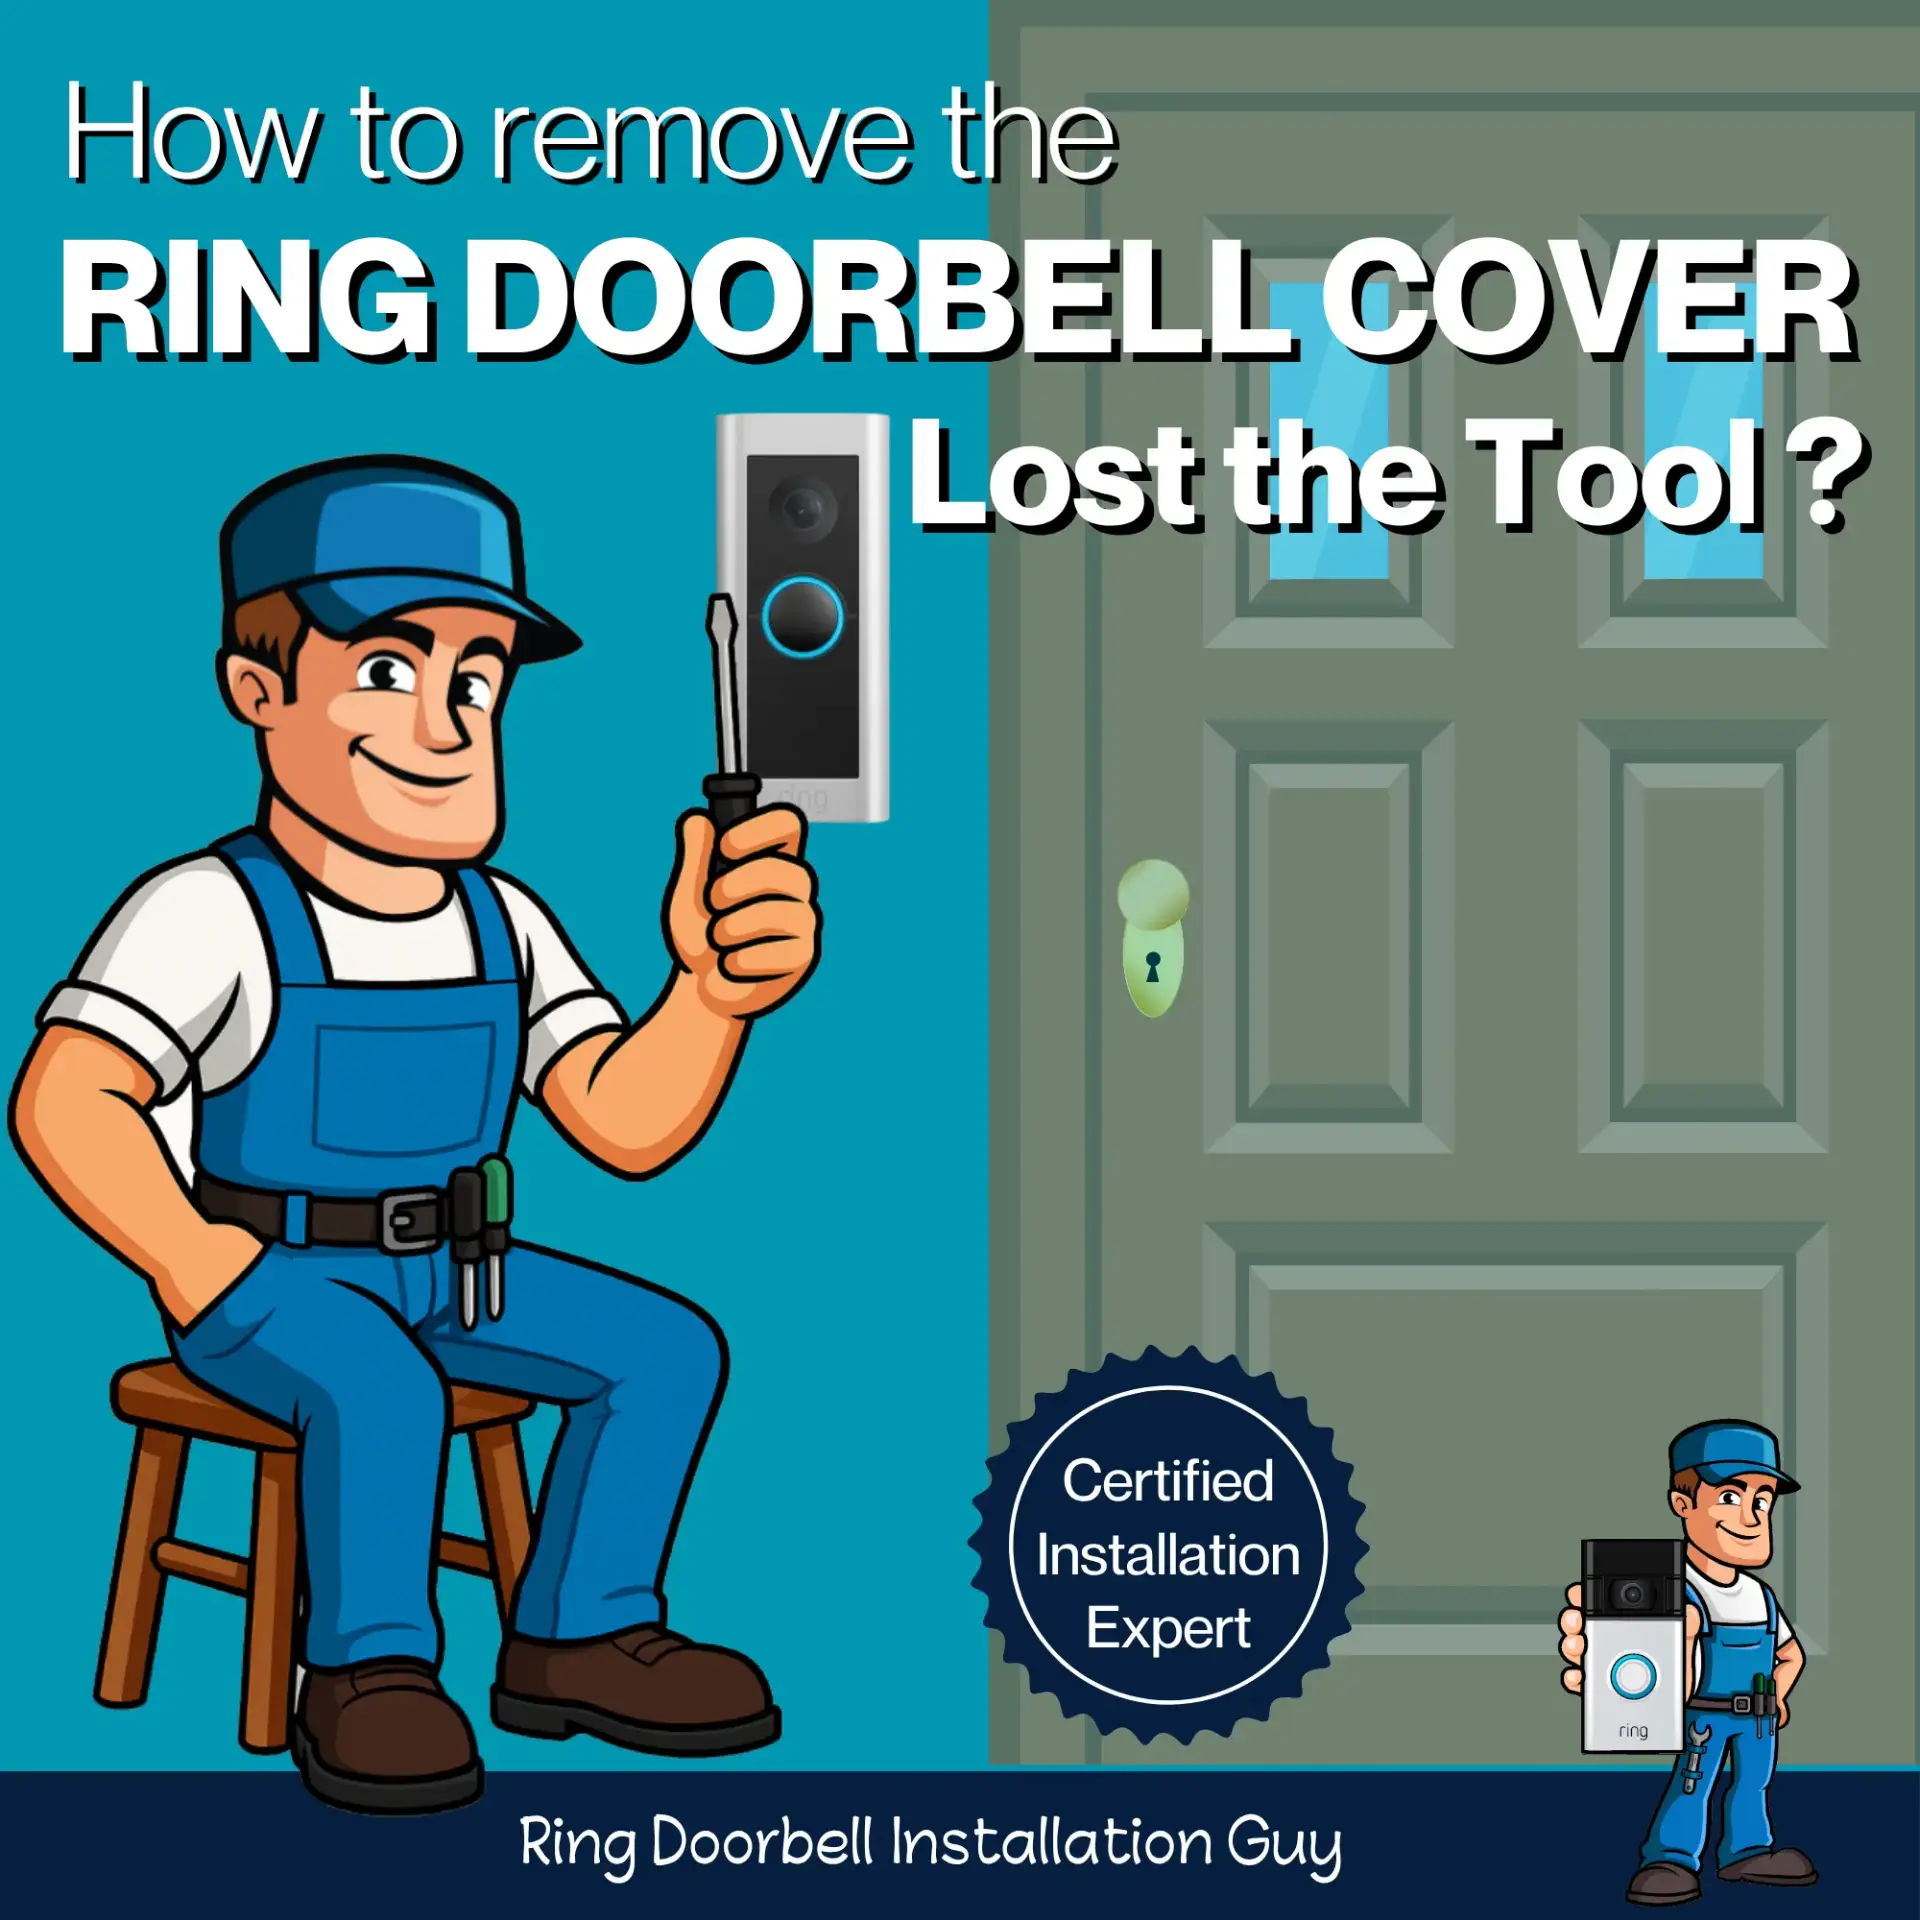
What Tool Do You Need to Remove The Ring Doorbell Cover?
How to Remove The Ring Doorbell Cover
Common Issues and Fixes
Stripped Screw? Here’s What to Do
FAQs About Removing The Ring Doorbell Cover
Why You Might Need to Remove The Ring Doorbell Cover
Removing the Ring Doorbell cover is something many homeowners find themselves needing to do at some point. It gives you access to the setup button, mounting hardware, battery compartment, and internal connections—all the key parts that may need attention during a typical install, troubleshooting, or upgrade. Here are the most common reasons you might need to Remove The Ring Doorbell Cover:
- To change the battery on battery-powered models
- To press the setup button and enter pairing mode
- To troubleshoot a connectivity or hardware issue
- To remove the doorbell and access the mounting screws
- To upgrade, relocate, or replace your Ring Doorbell
What Tool Do You Need to Remove The Ring Doorbell Cover?
Most Ring Doorbells use a Torx security screw—specifically a T15 or T20, depending on the model. These aren’t standard Torx screws; they’re security Torx, which means they have a small pin in the center of the screw head. Your screwdriver must have a matching hole in the middle to fit properly. If your tool doesn’t have that hollow center, it won’t engage with the screw—and you could strip it trying. Always check visually to confirm you’re using the correct driver before you Remove The Ring Doorbell Cover.
Which Ring Doorbells Use Which Torx Screw
Use this chart to find the right screwdriver size before you Remove The Ring Doorbell Cover:
| Ring Doorbell Model | Power Source | Transformer Needed | Common Use Case |
|---|---|---|---|
| Battery Doorbell | Battery | No | Basic installs with no existing wiring |
| Battery Doorbell Plus | Battery | No | Wider view, longer battery life |
| Battery Doorbell Pro | Battery | No | Advanced motion, dual-band Wi-Fi |
| Video Doorbell Wired | Wired | Yes (16–24V) | Budget option with compact design |
| Wired Doorbell Pro | Wired | Yes (high power) | High performance, customizable alerts |
| Video Doorbell Elite | PoE | No (uses Ethernet) | Premium installs, custom homes |
| Peephole Cam | Battery | No | Apartments or peephole replacement |
What If You Lost the Tool?
How to Remove the Ring Doorbell Cover
If you misplaced the original Ring screwdriver, you’re not alone. Luckily, replacements are easy to find:
- Order from the official Ring website.
- Find third-party Ring-compatible screwdrivers on Amazon.
- Buy a T15 or T20 Torx security driver at Home Depot, Lowe’s, Ace Hardware, or your local hardware store.
Tip: When searching on those sites, use terms like:
- T15 security Torx for Ring Doorbell
- Ring Doorbell screwdriver replacement
- Ring Doorbell tool for cover removal
- T20 tamper-proof screwdriver Ring
- Security Torx bit for Ring
- Buy Ring Doorbell Torx tool
- Ring Doorbell compatible screwdriver
- T15 tamper-proof bit for Ring cover
- T20 security driver for Ring Pro
- T15 security Torx Ring tool
- Ring Doorbell cover screwdriver
Follow these steps to safely Remove The Ring Doorbell Cover without damaging your device.
Prefer to watch instead? Here’s my own video on how to Remove The Ring Doorbell Cover.
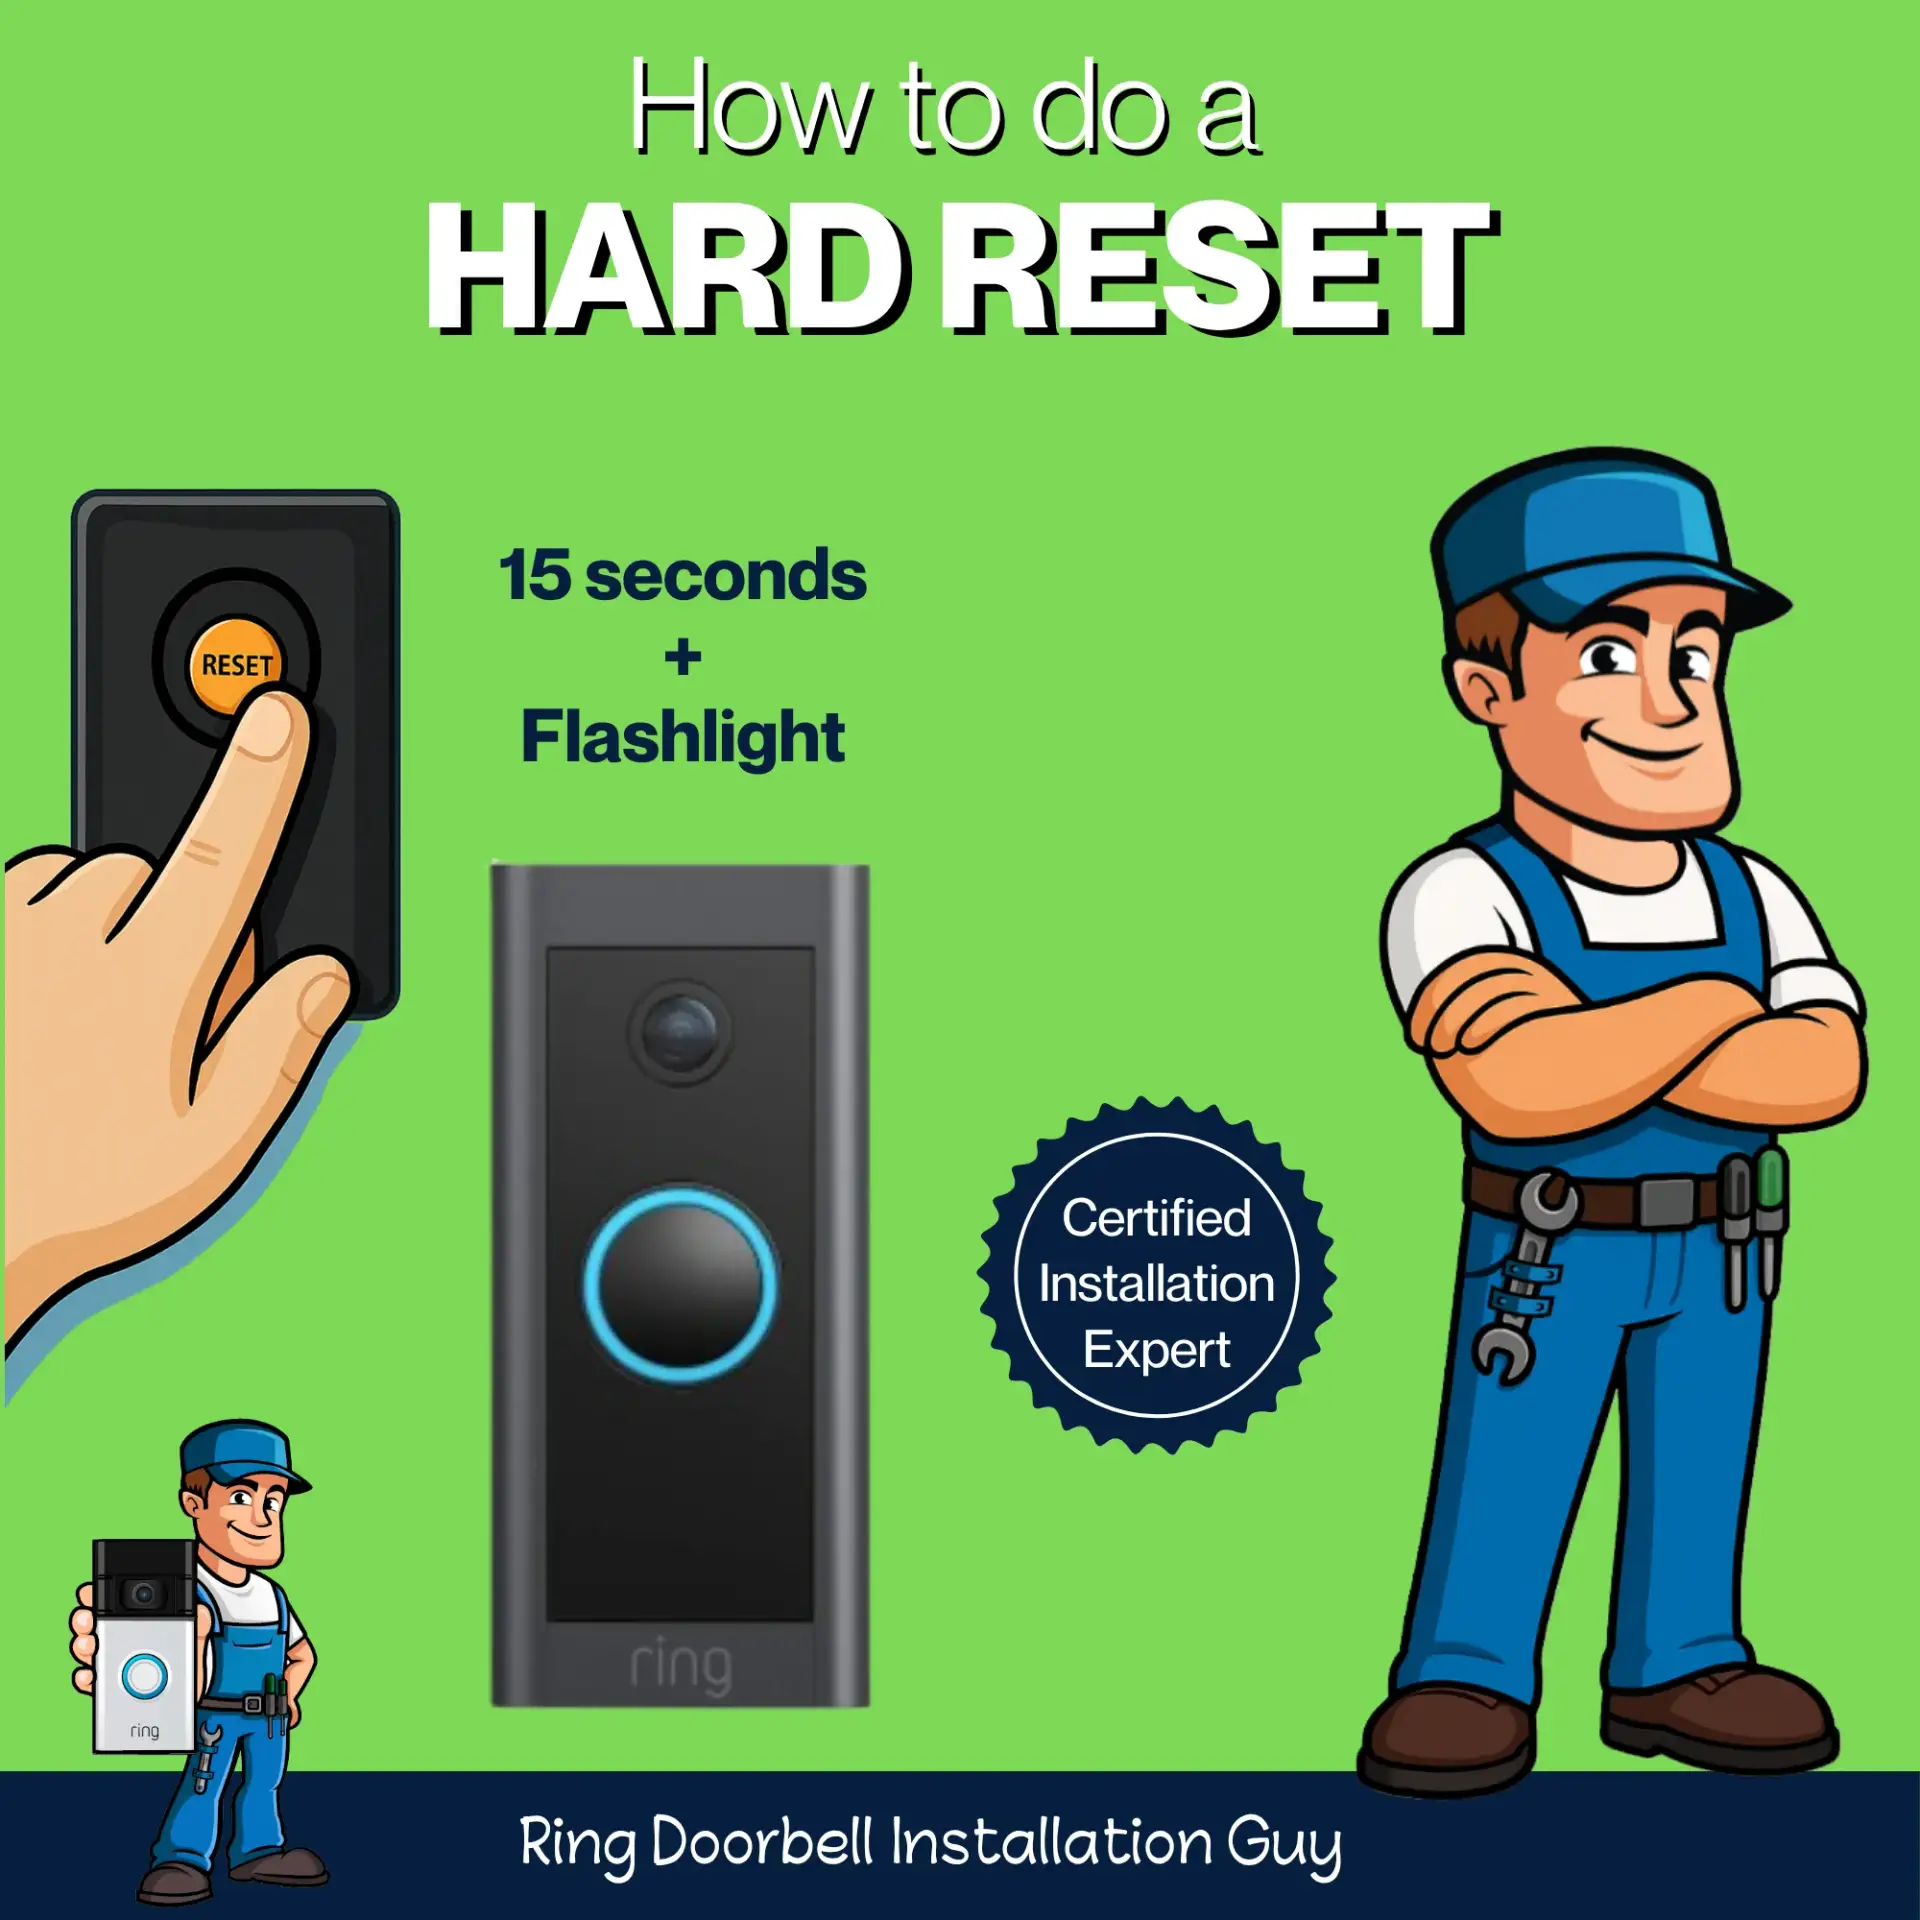
1. Locate the Screw
The screw is at the bottom of the faceplate. Identify whether your model uses a T15 or T20 Torx screw, and visually check that your screwdriver fits the screw properly—it should sit snugly in the star-shaped pattern. Using the wrong size can strip the screw or make removal difficult.
2. Remove the Screw
Insert the screwdriver firmly into the screw head and turn it counterclockwise—lefty loosey. Be gentle but steady, and continue turning until the screw is completely removed.
3. Gently Remove the Cover
Grip the faceplate gently at the sides near the bottom, pull it slightly outward, and then slide it upward. For extra control, place your other hand or a finger near the top of the doorbell to stabilize it—this helps prevent accidentally pulling the entire unit off the wall. If you’re wondering how to remove cover on Ring Doorbell, this is the critical step. Many of my customers squeeze too hard and end up yanking the whole unit—don’t do that!
My Ring Cover Won’t Budge
If your Ring cover won’t come off, start with the basics: check that the screw is completely out. If it still sticks, the problem is usually something simple—like paint, caulk, or dirt—holding it in place. The sections below walk through each of these issues and how to handle them so you can safely free the cover.
Screw
Always double-check that the security screw has been fully removed before trying to pull off the cover. You cant remove the cover if the screw is still there.
Paint
If paint has sealed the cover to the wall, gently score around the edge with a utility knife to break the bond. Take care not to scratch the doorbell covers or the doorbell housing.
Caulk
If caulk was applied around the cover, use a sharp blade to carefully cut along the seam. Peel away any loose caulk and clear the edges before attempting to remove the cover.
Dirt
Dirt or dust can harden and lock the cover in place. Use a soft brush or compressed air to loosen debris. For stubborn grime, a damp cloth or mild cleaner may help free up the edges.
Stripped Screw? Here’s What to Do
If the screw head is stripped and your screwdriver can’t grip it properly, don’t panic. You have a few last-resort methods you can try before giving up on removing the cover and ripping it off the wall and ordering a new Ring Doorbell.
Use Needle-Nose Pliers
If the screw is sticking out just slightly, try using needle-nose pliers to grip the screw head and twist it counterclockwise. Go slowly and apply steady pressure.
Try a Screw Extractor Kit
Screw extractor kits are inexpensive and available at hardware stores. They’re designed specifically for stripped screws. Insert the extractor bit into your drill and gently reverse the screw out.
Grind Off the Screw Head
Use a Dremel or rotary tool to carefully grind away the head of the screw. This is safer then the next method of drilling, especially if you’re working close to the device housing. Wear eye protection and take your time to avoid damaging the Ring Doorbell itself.
Drill Off the Screw Head
If all else fails, you can drill off the top of the screw using a metal bit slightly larger than the screw head. Once the head is removed, the cover will come off, and you can use pliers to unscrew the remaining shaft.
Warning: This should be your absolute last resort, as it can damage the cover or the battery if done improperly.
Break the Cover Off
If you don’t have access to the tools listed above, another option is to carefully break the plastic around the screw head using a flat prying tool. This lets you remove the cover. Once it’s off, you can then use the needle nose plyers to remove the security screw. You might be able to still use the cover, but most likely will need to order a replacement cover and screw online.
Frustrated? Here's Your Last Resort
If nothing else has worked—and you’re stuck with a screw that won’t budge or a cracked cover—it may be time to move on. You can carefully force the device off the wall, knowing it may damage the mounting bracket or the housing. This should only be done if you’re already planning to replace the Ring Doorbell and the cover or screw is beyond repair.
Note: Only do this if you’re replacing the device and it’s beyond saving.
FAQs About Removing The Ring Doorbell Cover
Here are answers to the most common questions people ask when trying to Remove The Ring Doorbell Cover — whether they’re dealing with lost tools, stripped screws, or just figuring out which screwdriver to use.
Most Ring models use a T15 or T20 Torx security screw, which has a pin in the middle. Make sure your screwdriver has a matching hole—regular Torx drivers won’t work. Use the chart above to confirm your model’s screw size.
Yes. You can use any T15 or T20 security Torx driver with a hollow center. These are available online or at hardware stores. See the “What If You Lost the Tool?” section for purchase links.
No. Ring uses security Torx screws, which have a pin in the center. A regular Torx won’t fit unless it has a hollow point. You’ll need a T15 or T20 security Torx driver.
You can often tell by checking the size of the screw head. T15 screws are smaller and more common on battery models. T20 screws are larger and typically used on Pro and Elite models. Check the chart above for your exact Ring model.
If the cover won’t budge, make sure the screw is fully removed. Clean off any paint, dirt, or debris around the edges. Then, use both hands to gently slide the cover upward while stabilizing the top of the device.
You can try using needle-nose pliers, a screw extractor kit, or carefully drill or grind the head off. Check the section above for a step-by-step guide to fixing a stripped Ring screw.
The setup button is hidden behind the cover of the Ring Doorbell. You’ll need to remove the cover to access it. Pressing this button puts the device into setup mode for pairing with Wi-Fi or connecting to a new phone.
No. Different models use different screws and slightly different cover styles. Refer to the chart in this guide to match your model to the correct Torx size.
Yes, if you have a battery-powered Ring model, it’s safe to remove the cover without powering down. For hardwired models, it’s best to shut off power at the breaker for added safety—especially if you’re removing the entire unit from the wall.
Author Bio – Dave, Ring Expert
I’m Dave, an independent installer based in Orange County, California. As the owner of Ring Doorbell Installation Guy, I specialize in Ring devices including cameras, doorbells, alarm systems, and transformers. With over a decade of hands-on experience, I provide dependable solutions that keep homes and businesses protected.